
This post is also available in:


Working in tandem with Samba’s effective personalized email campaigns are its robust Web Personalization features, which utilize customizable, embedded widgets that showcase highly-relevant products throughout an e-shop.
Harnessing customer data and its advanced artificial intelligence, Samba automatically recommends products based on a customer’s real-time interests and shopping history and takes into account stock levels, as well.
Creating a New Widget
To get started with adding your own Web Personalization widget, head over to your “Web personalization” section (see image below), which you can navigate to via your main menu.

From this section, you can not only create new widgets, but also view the statistics of existing widgets, which include:
- Impressions: Number of unique views of that widget
- Clicked: Number of click-throughs to a corresponding product via the widget
- Revenue: Revenue generated from those orders*
*Measures only when a customer clicks the product and purchases it within seven days.
To create a new widget, click the “New Widget” button.

Personalization Type and Widget Name
You’ll be asked to select the type of personalization you want to use. Select your option from the drop-down menu. Please note, you can embed the widget on both your e-shop home page and product pages.
- Homepage
- Displays recommended products that the customer himself or similar customers have been interested in recently.
- Product detail – Customers have also bought
- Displays products within the cross-sell strategy that might be relevant to the product the customer is currently viewing.
- For example, display covers, headphones, or protective cases with the purchase of a mobile phone.
- Product detail – You might like it
- Displays alternative products of the same type as the customer is currently viewing.
Once you’ve selected the type, be sure to name the widget. Please note, the name is only visible to you and not your customers.
Appearance
Just like with Samba’s Picasso email template editor, you can edit the widget’s appearance to better fit the look of your e-shop.
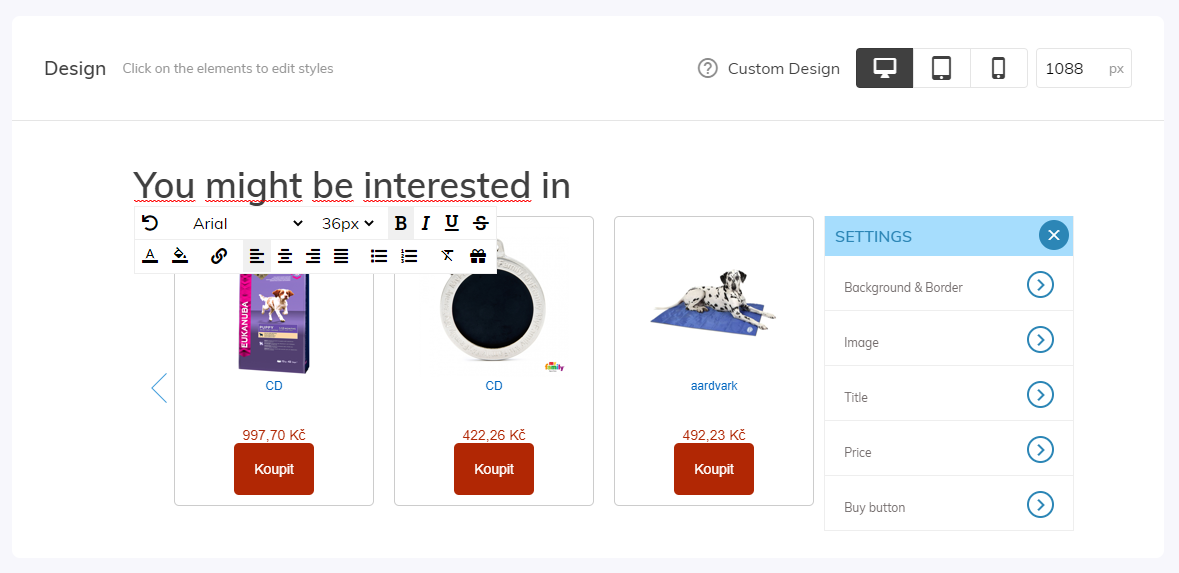
By clicking on a product, you can modify a variety of aspects including the font color, font size, button, border, and more. You can also edit the text above the widget that customers will see.
UTM Parameters (Optional)
In Samba, you can also set the UTM parameters (source, medium, campaign) that will be added to the link for personalized products on your site. Here’s an example:
https://www.vaseshop.cz/path/k/your/product?yottly_online=nazev_vasi_widgety&yottly_recommender=personalised-homepage&utm_source=samba&utm_medium=webpers&utm_campaign=yot_pers_home
According to these parameters, you can then easily analyze the benefits of each channel in a tool such as Google Analytics. If you leave a field blank (or for all of them), that parameter will not be added to the link.
HTML ID
You can use the HTML ID option to specify where you want to place the widget in your e-shop. Right-click on your page and click “View Page Source” and try to identify where to best embed a widget with personalized products.
Once you’ve selected a position within your HTML code, you’ll need to either include or identify a <div> tag that the widget will nest within, above it, or below it.
Take the “id” of that <div> and enter it into the HTML ID field in Samba and select where you want your widget positioned in relation to that <div> using the drop-down menu.
If you’re not sure how to do this process, we recommended getting professional assistance from someone who can help you.
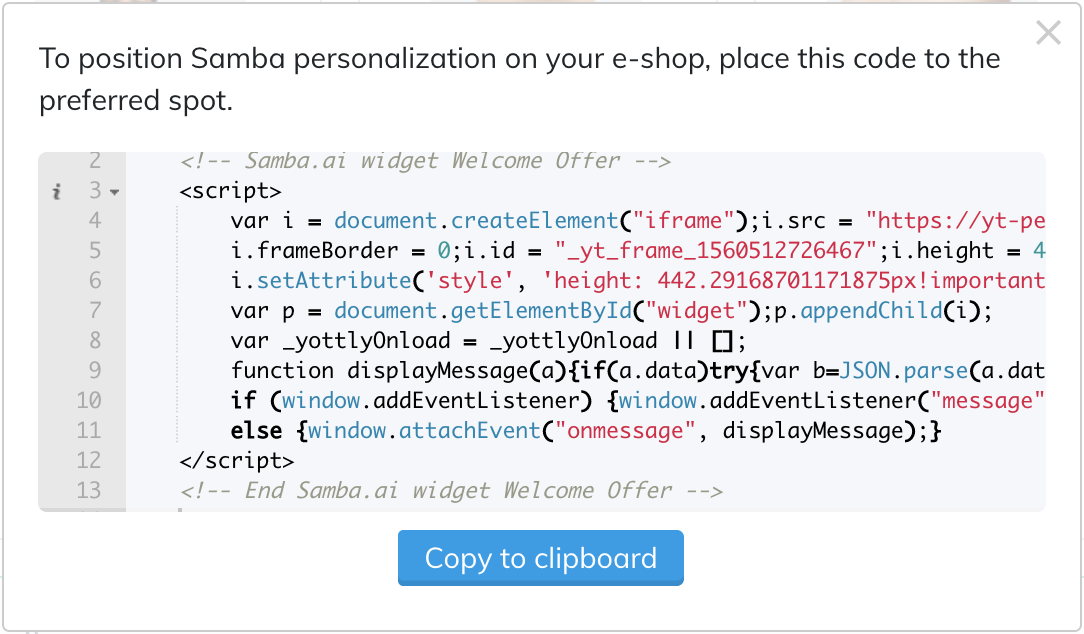
Once you’re finished with the settings and HTML ID, click on the “Save and Exit” button. Upon doing so, you’ll be presented with a script that needs to be placed in the HTML code of the page at the appropriate location. If you use Shoptet, from the administration click on the Appearance and Content – Editor tab. Select the HTML Code tab and find the footer at the bottom of the page. Put the Samba generated script there and save it. The results of web personalization can be viewed in detail on the main dashboard. This post is also available in:
Embedding
Embedding – Shoptet
Evaluation